Tutorial
MapConductor Tutorial
This tutorial walks you through how to use the MapConductor Android SDK to display a map, add markers and shapes, and handle user interactions.
What you’ll learn
- Installing and configuring the MapConductor SDK
- Displaying a map
- Adding markers, circles, and polylines
- Handling tap and click events
- Controlling camera position
- Switching map SDKs
Prerequisites
- Android Studio installed
- Basic knowledge of Jetpack Compose
- Basic Kotlin knowledge
Step 1: Project Setup
1-1. Add dependencies
Add MapConductor dependencies to your module-level build.gradle.kts or build.gradle:
dependencies {    val mapconductorVersion = "1.1.7"
    // Use BOM to unify versions    implementation(platform("com.mapconductor:mapconductor-bom:$mapconductorVersion"))
    // Core module (required)    implementation("com.mapconductor:core")
    // If using Google Maps    implementation("com.mapconductor:for-googlemaps")
    // Or if using Mapbox    // implementation("com.mapconductor:for-mapbox")
    // Or if using HERE Maps    // implementation("com.mapconductor:for-here")
    // Or if using ArcGIS    // implementation("com.mapconductor:for-arcgis")
    // Or if using MapLibre    // implementation("com.mapconductor:for-maplibre")}
dependencies { def mapconductorVersion = "1.1.7"
// Use BOM to unify versions implementation platform("com.mapconductor:mapconductor-bom:$mapconductorVersion")
// Core module (required) implementation "com.mapconductor:core"
// If using Google Maps implementation "com.mapconductor:for-googlemaps"
// Or if using Mapbox // implementation "com.mapconductor:for-mapbox"
// Or if using HERE Maps // implementation "com.mapconductor:for-here"
// Or if using ArcGIS // implementation "com.mapconductor:for-arcgis"
// Or if using MapLibre // implementation "com.mapconductor:for-maplibre"}1-2. Android configuration
Add the following configuration to build.gradle.kts or build.gradle:
plugin {  id("org.jetbrains.kotlin.plugin.compose:2.4.0")  id("org.jetbrains.kotlin.android:2.4.0")}
android {    compileSdk = 37
    defaultConfig {        minSdk = 26        targetSdk = 37    }
    buildFeatures {        compose = true    }
    composeOptions {        kotlinCompilerExtensionVersion =            project.property("2.4.0").toString()    }
    compileOptions {        sourceCompatibility = JavaVersion.VERSION_17        targetCompatibility = JavaVersion.VERSION_17    }
    kotlinOptions {        jvmTarget = "17"    }}
plugin { id("org.jetbrains.kotlin.plugin.compose:2.4.0") id("org.jetbrains.kotlin.android:2.4.0")}
android { compileSdk {ANDROID_TARGET_SDK_VERSION}
defaultConfig { minSdk {ANDROID_MIN_SDK_VERSION} targetSdk {ANDROID_TARGET_SDK_VERSION} }
buildFeatures { compose true }
composeOptions { kotlinCompilerExtensionVersion project.property("2.4.0").toString() }
compileOptions { sourceCompatibility JavaVersion.VERSION_{JAVA_VERSION} targetCompatibility JavaVersion.VERSION_{JAVA_VERSION} }
kotlinOptions { jvmTarget = '17' }}1-3. Map SDK Setup
Important: MapConductor provides a unified API layer on top of existing map SDKs. Before using MapConductor, you must set up each map SDK individually.
Each map SDK requires its own API keys, permissions, and configuration:
- Google Maps Setup – Google Maps SDK API keys and permissions
- Mapbox Setup – Mapbox access token and style configuration
- HERE Maps Setup – HERE SDK API keys and licensing
- ArcGIS Setup – ArcGIS SDK API keys and licensing
- MapLibre Setup – Tile and style configuration
Step 2: Display a Simple Map
Let’s start with the simplest way to display a map - showing a map centered on Tokyo.
import androidx.compose.runtime.Composableimport androidx.compose.ui.Modifierimport com.mapconductor.core.GeoPointimport com.mapconductor.core.MapCameraPositionimport com.mapconductor.googlemaps.GoogleMapViewimport com.mapconductor.googlemaps.rememberGoogleMapViewState
@Composablefun MyFirstMap(modifier: Modifier = Modifier) { // Tokyo coordinates val tokyo = GeoPoint.fromLatLong(35.6812, 139.7671)
// Initial camera position val initialCamera = MapCameraPosition( position = tokyo, zoom = 12 )
// State management val mapViewState = rememberGoogleMapViewState( cameraPosition = initialCamera )
// Display map GoogleMapView( modifier = modifier, state = mapViewState )}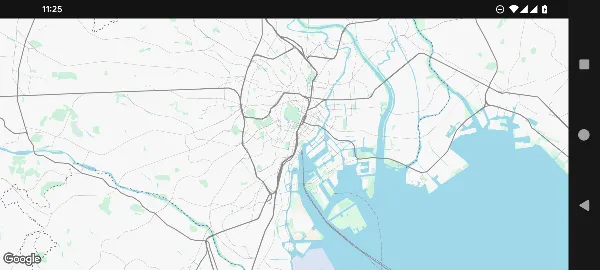 Note: Demo styling is modified from the default for clarity
That’s it! Now you have a map centered on Tokyo displayed in your app.
Step 3: Add Markers
Let’s add markers to the map.
import androidx.compose.foundation.layout.fillMaxSizeimport androidx.compose.runtime.Composableimport androidx.compose.ui.Modifierimport com.mapconductor.core.*import com.mapconductor.googlemaps.GoogleMapViewimport com.mapconductor.googlemaps.rememberGoogleMapViewState
@Composablefun MapWithMarkers(modifier: Modifier = Modifier) {    // Coordinates    val marker1 = GeoPoint.fromLatLong(35.6586, 139.7454)    val marker2 = GeoPoint.fromLatLong(35.7101, 139.8107)
    // Initial position    val initialCamera = MapCameraPosition(        position = GeoPoint.fromLatLong(35.6586, 139.7454),        zoom = 11    )
    val mapViewState = rememberGoogleMapViewState(        cameraPosition = initialCamera    )    val onMarkerClick: (MarkerState) -> Unit = { markerState ->        println("Handle marker click${markerState.extra}")    }
    GoogleMapView(        modifier = modifier.fillMaxSize(),        state = mapViewState    ) {        // Add markers        Marker(            position = marker1,            icon = ColorDefaultIcon(label = "Tokyo Tower"),            extra = "marker1",            onClick = onMarkerClick        )
        Marker(            position = marker2,            icon = ColorDefaultIcon(label = "Sky Tree"),            extra = "marker2",            onClick = onMarkerClick        )    }}
Note: Demo styling is modified from the default for clarity
Customize Markers
You can further customize markers with colors and styling:
Marker( position = GeoPoint.fromLatLong(35.6586, 139.7454), icon = ColorDefaultIcon( label = "TT", backgroundColor = Color.Red, textColor = Color.White ), extra = "tokyo_tower", anchor = Offset(0.5f, 1.0f) // Anchor info)Step 4: Add Circles and Polylines
4-1. Add Circles
Let’s draw a circle around a marker.
import androidx.compose.ui.graphics.Color
GoogleMapView( modifier = modifier.fillMaxSize(), state = mapViewState) { // Marker Marker( position = GeoPoint.fromLatLong(35.6586, 139.7454), icon = ColorDefaultIcon(label = "TT"), extra = "tokyo_tower" )
// Draw circle Circle( center = GeoPoint.fromLatLong(35.6586, 139.7454), radiusMeters = 1000, // Radius (meters) strokeColor = Color.Blue, strokeWidth = 3.dp, // Stroke width (dp) fillColor = Color.Blue.copy(alpha = 0.2f) )}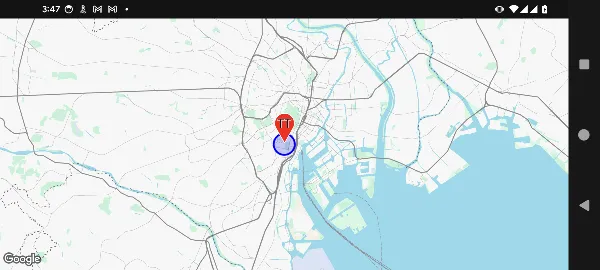 Note: Demo styling is modified from the default for clarity
4-2. Add Polylines
Now let’s draw a line connecting two points.
GoogleMapView( modifier = modifier.fillMaxSize(), state = mapViewState) { // Markers Marker(position = GeoPoint.fromLatLong(35.6586, 139.7454), icon = ColorDefaultIcon(label = "TT")) Marker(position = GeoPoint.fromLatLong(35.7101, 139.8107), icon = ColorDefaultIcon(label = "ST"))
// Draw line Polyline( points = listOf( GeoPoint.fromLatLong(35.6586, 139.7454), GeoPoint.fromLatLong(35.7101, 139.8107) ), strokeColor = Color.Red, strokeWidth = 5.dp )}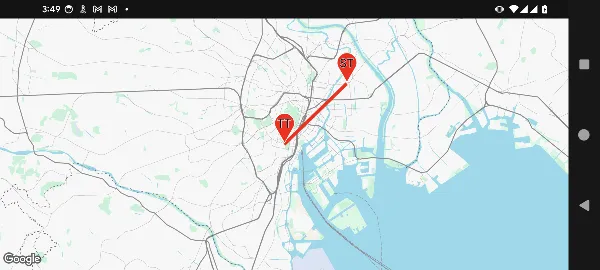 Note: Demo styling is modified from the default for clarity
Step 5: Handle User Interactions
5-1. Map Click Events
You can handle when users tap the map:
import androidx.compose.runtime.*
@Composablefun InteractiveMap(modifier: Modifier = Modifier) {    var clickedPosition by remember { mutableStateOf<GeoPointInterface?>(null) }
    val initialCamera = MapCameraPosition(        position = GeoPoint.fromLatLong(35.6812, 139.7671),        zoom = 12    )
    val mapViewState = rememberGoogleMapViewState(        cameraPosition = initialCamera    )
    GoogleMapView(        modifier = modifier.fillMaxSize(),        state = mapViewState,        onMapClick = { geoPoint ->            // Map clicked            clickedPosition = geoPoint            println("Click position${geoPoint.latitude}, ${geoPoint.longitude}")        }    ) {        // Show marker        clickedPosition?.let { position ->            Marker(                position = position,                icon = ColorDefaultIcon(label = "!"),                extra = "clicked_marker"            )        }    }}
Note: Demo styling is modified from the default for clarity
5-2. Marker Click Events
Handle clicks on markers and trigger animations:
val marker1 = GeoPoint.fromLatLong(35.6586, 139.7454)val marker2 = GeoPoint.fromLatLong(35.7101, 139.8107)
GoogleMapView(    modifier = modifier.fillMaxSize(),    state = mapViewState) {    Marker(        position = marker1,        icon = ColorDefaultIcon(label = "TT"),        extra = "marker1",        onClick = { markerState ->            // Handle marker click            markerState.animate(MarkerAnimation.Drop)        }    )    Marker(        position = marker2,        icon = ColorDefaultIcon(label = "ST"),        extra = "marker2",        onClick = { markerState ->            // Handle marker click            markerState.animate(MarkerAnimation.Bounce)        }    )}
Note: Demo styling is modified from the default for clarity
Step 6: Control the Camera
6-1. Move Camera to Specific Location
Use buttons to move the camera to different locations:
import androidx.compose.foundation.layout.*import androidx.compose.material3.Buttonimport androidx.compose.material3.Textimport androidx.compose.runtime.rememberCoroutineScopeimport kotlinx.coroutines.launch
@Composablefun MapWithCameraControl(modifier: Modifier = Modifier) {    val marker1 = GeoPoint.fromLatLong(35.6586, 139.7454)    val marker2 = GeoPoint.fromLatLong(35.7101, 139.8107)
    val mapViewState = rememberGoogleMapViewState(        cameraPosition = MapCameraPosition(            position = marker1,            zoom = 12.0        )    )
    val scope = rememberCoroutineScope()
    Column(modifier = modifier.fillMaxSize()) {        // Buttons        Row(            modifier = Modifier.fillMaxWidth(),            horizontalArrangement = Arrangement.SpaceEvenly        ) {            Button(onClick = {                scope.launch {                    mapViewState.moveCameraTo(                        MapCameraPosition(                            position = marker1,                            zoom = 15                        ),                        durationMillis = 1000                    )                }            }) {                Text("Tokyo Tower")            }
            Button(onClick = {                scope.launch {                    mapViewState.moveCameraTo(                        MapCameraPosition(                            position = marker2,                            zoom = 15                        ),                        durationMillis = 1000                    )                }            }) {                Text("Sky Tree")            }        }
        // 地図        GoogleMapView(            modifier = Modifier.fillMaxSize(),            state = mapViewState        ) {            Marker(position = marker1, icon = ColorDefaultIcon(label = "TT"))            Marker(position = marker2, icon = ColorDefaultIcon(label = "ST"))        }    }}
6-2. Monitor Camera Move Events
Listen to camera movement events:
GoogleMapView( modifier = modifier.fillMaxSize(), state = mapViewState, onCameraMoveStart = { println("Camera move started") }, onCameraMove = { cameraPosition -> println("Camera position: ${cameraPosition.position.latitude}, ${cameraPosition.position.longitude}") }, onCameraMoveEnd = { println("Camera move ended") }) { // Markers etc.}Step 7: Switch Map SDKs
MapConductor’s biggest advantage is the ability to switch map providers with minimal code changes.
Switching from Google Maps to Mapbox
import com.mapconductor.googlemaps.GoogleMapViewimport com.mapconductor.googlemaps.rememberGoogleMapViewState
@Composablefun MyMap() {    val mapViewState = rememberGoogleMapViewState(        cameraPosition = initialCamera    )
    GoogleMapView(        state = mapViewState    ) {        // Markers and other components    }}
import com.mapconductor.mapbox.MapboxMapViewimport com.mapconductor.mapbox.rememberMapboxViewState
@Composablefun MyMap() { val mapViewState = rememberMapboxViewState( cameraPosition = initialCamera )
MapboxMapView( state = mapViewState ) { // Markers and other components (no change!) }}Markers, circles, polylines, and other components work with exactly the same code!
Map SDK Reference Table
| Map SDK | MapViewStateInterface | MapView |
|---|---|---|
| Google Maps | rememberGoogleMapViewState | GoogleMapView |
| Mapbox | rememberMapboxViewState | MapboxMapView |
| HERE Maps | rememberHereMapViewState | HereMapView |
| ArcGIS | rememberArcGISMapViewState | ArcGISMapView |
| MapLibre | rememberMapLibreViewState | MapLibreMapView |
Complete Sample Code
Here’s the complete sample code combining everything you’ve learned:
import androidx.compose.foundation.layout.*import androidx.compose.material3.Buttonimport androidx.compose.material3.Textimport androidx.compose.runtime.*import androidx.compose.ui.Modifierimport androidx.compose.ui.graphics.Colorimport androidx.compose.ui.unit.dpimport com.mapconductor.core.*import com.mapconductor.googlemaps.GoogleMapViewimport com.mapconductor.googlemaps.rememberGoogleMapViewStateimport kotlinx.coroutines.launch
@Composablefun CompleteSample(modifier: Modifier = Modifier) {    val context = LocalContext.current
    // Position information    val marker1 = GeoPoint.fromLatLong(35.6586, 139.7454)    val marker2 = GeoPoint.fromLatLong(35.7101, 139.8107)
    // Save clicked position    var clickedPosition by remember { mutableStateOf<GeoPointInterface?>(null) }
    val initialCamera = MapCameraPosition(        position = GeoPoint.fromLatLong(35.6812, 139.7671),        zoom = 12.0    )
    val mapViewState = rememberGoogleMapViewState(        cameraPosition = initialCamera    )    val scope = rememberCoroutineScope()    val onMarkerClick: (MarkerState) -> Unit = { markerState ->        Toast            .makeText(                context,                "clicked: ${markerState.extra}",                Toast.LENGTH_SHORT,            )            .show()    }
    Column(modifier = modifier.fillMaxSize()) {        // Control buttons        Row(            modifier = Modifier                .fillMaxWidth()                .padding(8.dp),            horizontalArrangement = Arrangement.SpaceEvenly        ) {            Button(onClick = {                scope.launch {                    mapViewState.moveCameraTo(                        MapCameraPosition(position = marker1, zoom = 15.0),                        durationMillis = 1000                    )                }            }) {                Text("TT")            }
            Button(onClick = {                scope.launch {                    mapViewState.moveCameraTo(                        MapCameraPosition(position = marker2, zoom = 15.0),                        durationMillis = 1000                    )                }            }) {                Text("ST")            }        }
        // Map        GoogleMapView(            modifier = Modifier.fillMaxSize(),            state = mapViewState,            onMapClick = { geoPoint ->                clickedPosition = geoPoint            }        ) {            // Markers            Marker(                position = marker1,                icon = ColorDefaultIcon(                    label = "TT",                    fillColor = Color.Red,                ),                extra = "marker1",                onClick = onMarkerClick            )
            Marker(                position = marker2,                icon = ColorDefaultIcon(                    label = "ST",                    fillColor = Color.Blue                ),                extra = "marker2",                onClick = onMarkerClick            )
            // Marker for clicked position            clickedPosition?.let { position ->                Marker(                    position = position,                    icon = ColorDefaultIcon(                        label = "!",                        fillColor = Color.Green                    ),                    extra = "clicked",                    onClick = onMarkerClick                )            }
            // Circle            Circle(                center = marker1,                radiusMeters = 1000,                strokeColor = Color.Red,                fillColor = Color.Red.copy(alpha = 0.2f)            )
            Circle(                center = marker2,                radiusMeters = 1000,                strokeColor = Color.Blue,                fillColor = Color.Blue.copy(alpha = 0.2f)            )
            // Polyline            Polyline(                points = listOf(marker1, marker2),                strokeColor = Color.Magenta,                strokeWidth = 3.dp            )        }    }}
Next Steps
You’ve learned the basics of the MapConductor SDK. To learn more, check out:
- Modules – Detailed module descriptions
- Provider Compatibility – Feature compatibility matrix
- SDK Version Compatibility – Supported SDK versions
Troubleshooting
Map not displaying
- Verify your API key is configured correctly
- Check your internet connection
- Verify required permissions are added to
AndroidManifest.xml
Build errors
- Verify
minSdkis set to 26 or higher - Check that Kotlin and Compose versions are compatible
- Verify dependencies are added correctly
Markers not clickable
- Verify
MarkerState.onClickis configured - Ensure markers have the
extraproperty set